Friday, February 23, 2018

Bluetooth LE with Nordic nRF51 & nRF52 series
The easy way!
Part 3


Custom service
(UART over BLE)


We have looked at how to advertise in previous post.  Now, lets see how simple it is to create a BLE custom service.  For this purpose, we'll create an UART to BLE firmware that sends whatever it received on UART RX to BLE and whatever that is received from BLE to UART TX.

First thing first, lets start by initializing the UART interface.  As mentioned before the concept of EHAL is very simple.  Everything is initialized with a Config data first then just use.

The UART interface configuration starts by defining I/O pins to be used for the UART.

/// UART pins definitions
static IOPINCFG s_UartPins[] = {
    {UART_RX_PORT, UART_RX_PIN, UART_RX_PINOP, IOPINDIR_INPUT, IOPINRES_NONE, IOPINTYPE_NORMAL}, // RX
    {UART_TX_PORT, UART_TX_PIN, UART_TX_PINOP, IOPINDIR_OUTPUT, IOPINRES_NONE, IOPINTYPE_NORMAL}, // TX
    {UART_CTS_PORT, UART_CTS_PIN, UART_CTS_PINOP, IOPINDIR_INPUT, IOPINRES_NONE, IOPINTYPE_NORMAL}, // CTS
    {UART_RTS_PORT, UART_RTS_PIN, UART_RTS_PINOP, IOPINDIR_OUTPUT, IOPINRES_NONE, IOPINTYPE_NORMAL}, // RTS
};


Then the configuration data and the UART interface instance.

/// UART configuration
const UARTCFG g_UartCfg = {
    0, // Device number zero based
    s_UartPins, // UART assigned pins
    sizeof(s_UartPins) / sizeof(IOPINCFG),// Total number of UART pins used
    1000000, // Baudrate
    8, // Data bits
    UART_PARITY_NONE, // Parity
    1, // Stop bit
    UART_FLWCTRL_HW, // Flow control
    true, // Interrupt mode
    APP_IRQ_PRIORITY_LOW, // Interrupt priority
    nRFUartEvthandler, // UART event handler
    true, // Blocking FIFO
};

/// UART object instance
UART g_Uart;

Initialize the interface :

    g_Uart.Init(g_UartCfg);

Using UART :

    g_Uart.printf("Hello\r\n");


Now the BLE configuration for custom service.

/// Characteristic definitions
BLESRVC_CHAR g_UartChars[] = {
    {
  // Read characteristic
BLUEIO_UUID_UART_RX_CHAR,
20,
BLESVC_CHAR_PROP_READ | BLESVC_CHAR_PROP_NOTIFY | BLESVC_CHAR_PROP_VARLEN,
s_RxCharDescString, // char UTF-8 description string
NULL, // Callback for write char, set to NULL for read char
NULL, // Callback on set notification
NULL, // Tx completed callback
NULL, // pointer to char default values
0, // Default value length in bytes
    },
    {
// Write characteristic
BLUEIO_UUID_UART_TX_CHAR,// char UUID
20, // char max data length
BLESVC_CHAR_PROP_WRITEWORESP,// char properties define by BLUEIOSVC_CHAR_PROP_...
s_TxCharDescString, // char UTF-8 description string
UartTxSrvcCallback, // Callback for write char, set to NULL for read char
NULL, // Callback on set notification
NULL, // Tx completed callback
NULL, // pointer to char default values
0 // Default value length in bytes
    },
};

/// Service definition
const BLESRVC_CFG s_UartSrvcCfg = {
    BLESRVC_SECTYPE_NONE, // Secure or Open service/char
    BLUEIO_UUID_BASE, // Base UUID
    BLUEIO_UUID_UART_SERVICE, // Service UUID
    2, // Total number of characteristics for the service
    g_UartChars, // Pointer a an array of characteristic
    g_LWrBuffer, // pointer to user long write buffer
    sizeof(g_LWrBuffer) // long write buffer size
};

BLESRVC g_UartBleSrvc;

const BLEAPP_DEVDESC s_UartBleDevDesc {
    MODEL_NAME,           // Model name
    MANUFACTURER_NAME, // Manufacturer name
    "", // Serial number string
    "0.0", // Firmware version string
    "0.0", // Hardware version string
};

const BLEAPP_CFG s_BleAppCfg = {
    { // Clock config nrf_clock_lf_cfg_t
#ifdef IMM_NRF51822
  NRF_CLOCK_LF_SRC_RC, // Source RC
1, 1, 0
#else
NRF_CLOCK_LF_SRC_XTAL, // Source 32KHz XTAL
0, 0, NRF_CLOCK_LF_ACCURACY_20_PPM
#endif
    },
    0, // Number of central link
    1, // Number of peripheral link
    BLEAPP_MODE_APPSCHED, // Use scheduler
    DEVICE_NAME, // Device name
    ISYST_BLUETOOTH_ID, // PnP Bluetooth/USB vendor id
    1, // PnP Product ID
    0, // Pnp prod version
    true, // Enable device information service (DIS)
    &s_UartBleDevDesc,
    g_ManData, // Manufacture specific data to advertise
    sizeof(g_ManData), // Length of manufacture specific data
    BLEAPP_SECTYPE_STATICKEY_MITM,//BLEAPP_SECTYPE_NONE,    // Secure connection type
    BLEAPP_SECEXCHG_NONE, // Security key exchange
    NULL,      // Service uuids to advertise
    0, // Total number of uuids
    APP_ADV_INTERVAL, // Advertising interval in msec
    APP_ADV_TIMEOUT_IN_SECONDS, // Advertising timeout in sec
    0, // Slow advertising interval, if > 0, fallback to
// slow interval on adv timeout and advertise until connected
    MIN_CONN_INTERVAL,
    MAX_CONN_INTERVAL,
    BLUEIO_CONNECT_LED_PORT, // Led port nuber
    BLUEIO_CONNECT_LED_PIN, // Led pin number
    0, // Tx power
    NULL // RTOS Softdevice handler

};


In order to handle the UART receive and send it to BLE, we need to hookup the UART event handler.

void UartRxChedHandler(void * p_event_data, uint16_t event_size)
{
    uint8_t buff[128];

    int l = g_Uart.Rx(buff, 128);
    if (l > 0)
    {
BleSrvcCharNotify(&g_UartBleSrvc, 0, buff, l);
    }
}

int nRFUartEvthandler(UARTDEV *pDev, UART_EVT EvtId, uint8_t *pBuffer, int BufferLen)
{
    int cnt = 0;
    uint8_t buff[20];

    switch (EvtId)
    {
case UART_EVT_RXTIMEOUT:
case UART_EVT_RXDATA:
           app_sched_event_put(NULL, 0, UartRxChedHandler);
           break;
case UART_EVT_TXREADY:
           break;
case UART_EVT_LINESTATE:
           break;
    }

    return cnt;


}

Handling received date from BLE and transmit to UART Tx.

void UartTxSrvcCallback(BLESRVC *pBlueIOSvc, uint8_t *pData, int Offset, int Len)
{
    g_Uart.Tx(pData, Len);
}


Those the main parts of this example.  Full source code is located here as part of the IOsonata library.

Part 1 Part 2

Tuesday, January 2, 2018

Bluetooth LE with Nordic nRF51 & nRF52 series
The easy way!
Part 2


Advertising environmental sensor data
(Temperature, Humidity, Pressure)
with Bosch BME280 & BME680 


In previous post, we advertise over Bluetooth only an incremental counter.  Lets do something more interesting this time by advertising environmental sensor data, temperature, pressure and humidity.  Most digital sensors can be communicated using either I2C or SPI interface.  EHAL provides a simple way to us those interface.  Similar to the BLE interface, the I2C & SPI also make use to configuration data structure and an Init function.


The hardware 


The environmental sensors used in this example are the BME280 and BME680 from Bosch.

Bluetooth 5 Sensor Board
avail at https://www.crowdsupply.com/i-syst/blyst-nano


The BME680 breakout board available on Tindie
this board support both I2C & SPI interface.


Configuring I2C for the BME680 breakout board


// Configure I2C interface
static const I2CCFG s_I2cCfg = {
  0, // I2C device number
{
        // I2C pins in which the device is connected to.
{I2C0_SDA_PORT, I2C0_SDA_PIN, I2C0_SDA_PINOP, IOPINDIR_BI, IOPINRES_NONE, IOPINTYPE_NORMAL},
{I2C0_SCL_PORT, I2C0_SCL_PIN, I2C0_SCL_PINOP, IOPINDIR_OUTPUT, IOPINRES_NONE, IOPINTYPE_NORMAL},
},
100000, // Rate in Hz
I2CMODE_MASTER,
0, // Slave address
5, // Retry
7, // Interrupt prio
NULL // Event callback
};

// I2C interface instance

I2C g_I2c;

Initialize the I2C interface.

    g_I2c.Init(s_I2cCfg);

The I2C is now ready to use.   Now lets try to use it to read the Bosch BME680 device ID directly.

    uint8_t regaddr = 0xD0; // BME680 device ID register address
    uint8_t d;

    g_I2c.Read(0x76, // BME680 I2C Device address
               &regaddr, 1, // register address to read
              &d, 1 // buffer to return data
              );

    printf("BME680 device id = 0x%02x\r\n", d);

If the device is connected correctly, the variable d should contains the value 0x61 (97 decimal).  

Configuring SPI

// Motsai Neblina V2 module uses SPI interface

static const IOPINCFG gsSpiBoschPin[] = {
    {SPI_SCK_PORT, SPI_SCK_PIN, SPI_SCK_PINOP,
     IOPINDIR_OUTPUT, IOPINRES_NONE, IOPINTYPE_NORMAL},
    {SPI_MISO_PORT, SPI_MISO_PIN, SPI_MISO_PINOP,
     IOPINDIR_INPUT, IOPINRES_NONE, IOPINTYPE_NORMAL},
    {SPI_MOSI_PORT, SPI_MOSI_PIN, SPI_MOSI_PINOP,
     IOPINDIR_OUTPUT, IOPINRES_NONE, IOPINTYPE_NORMAL},
    {SPI_BME280_CS_PORT, SPI_BME280_CS_PIN, SPI_BME280_CS_PINOP,
     IOPINDIR_OUTPUT, IOPINRES_PULLUP, IOPINTYPE_NORMAL},
};

static const SPICFG s_SpiCfg = {
    SPI_DEVNO,
    SPIMODE_MASTER,
    gsSpiBoschPin,
    sizeof( gsSpiBoschPin ) / sizeof( IOPINCFG ),
    8000000,   // Speed in Hz
    8,      // Data Size
    5,      // Max retries
    SPIDATABIT_MSB,
    SPIDATAPHASE_SECOND_CLK, // Data phase
    SPICLKPOL_LOW,         // clock polarity
    SPICSEL_AUTO,
    6, //APP_IRQ_PRIORITY_LOW,      // Interrupt priority
    nullptr
};


SPI g_Spi;

Initialize the SPI interface

    // Initialize I2C
    g_Spi.Init(s_SpiCfg);

The SPI is now ready to use.   Now lets try to use it to read the Bosch BME280 device ID directly.

    uint8_t regaddr = 0xD0; // BME280 device ID register address
    uint8_t d;

    g_Spi.Read(0x76, // BME280 I2C Device address
               &regaddr, 1, // register address to read
              &d, 1 // buffer to return data
               );


    printf("BME280 device id = 0x%02x\r\n", d);

If the device is connected correctly, the variable d should contains the value 0x60 (96 decimal).

Luckily we don't need to manually reading data from the sensor that way.  The EHAL already have driver written for both the BME280 & the BM680.  Here is how to initialize the driver and read sensor data.


Configuring sensor drivers 


// Configure environmental sensor

// Configure BME680 for I2C
static TPHSENSOR_CFG s_Bme680SensorCfg = {
  BME680_I2C_DEV_ADDR0,   // I2C device address
SENSOR_OPMODE_SINGLE,
100, // Sampling frequency in Hz
1,
1,
1,
1
};

// BME680 Environmental sensor instance
TphgBme680 g_Bme680Sensor;


// Configure BME280 for SPI
static TPHSENSOR_CFG s_Bme280SensorCfg = {
  0,   // SPI chip select index
SENSOR_OPMODE_SINGLE,
100, // Sampling frequency in Hz
1,
1,
1,
1
};

// BME280 Environmental sensor instance
TphBme280 g_Bme280Sensor;

Initialization and reading sensor data

    // Intitialize BM680 using I2C interface
    g_Bme680Sensor.Init(s_Bme680SensorCfg, &g_I2c, NULL);
    
    // or
    // intitialize BM680 using SPI interface
    g_Bme680Sensor.Init(s_Bme680SensorCfg, &g_Spi, NULL);

    // Intitialize BM280 using SPI interface
    g_Bme280Sensor.Init(s_Bme280SensorCfg, &g_Spi, NULL);

    // Update sensor data
    TPHSENSOR_DATA tphdata;

    g_Bme680Sensor.StartSampling();
    g_Bme680Sensor.Read(tphdata);

    g_Bme280Sensor.StartSampling();
    g_Bme280Sensor.Read(tphdata);


Integrating into BLE advertising data

In the previous article, we advertising only a 32bits count.  Let replace the configuration now to advertise the sensor data instead

BLEADV_MANDATA g_AdvData

const BLEAPP_CFG s_BleAppCfg = {
    { // Clock config nrf_clock_lf_cfg_t
#ifdef IMM_NRF51822
        NRF_CLOCK_LF_SRC_RC, // Source RC
        1, 1, 0
#else
        0, 0, NRF_CLOCK_LF_ACCURACY_20_PPM
#endif
    },
    0, // Number of central link
    0, // Number of peripheral link
    BLEAPP_MODE_NOCONNECT// Connectionless beacon type
    DEVICE_NAME,            // Device name
    ISYST_BLUETOOTH_ID,     // PnP Bluetooth/USB vendor id
    1,                      // PnP Product ID
    0,       // Pnp prod version
    false,    // Enable device information service (DIS)
    NULL,     // Pointer device info descriptor
    (uint8_t*)& g_AdvData,   // Manufacture specific data to advertise
    sizeof(g_AdvData),      // Length of manufacture specific data
    BLEAPP_SECTYPE_NONE,    // Secure connection type
    BLEAPP_SECEXCHG_NONE,   // Security key exchange
    NULL,          // Service uuids to advertise
    0,     // Total number of uuids
    APP_ADV_INTERVAL,       // Advertising interval in msec
    APP_ADV_TIMEOUT_IN_SECONDS, // Advertising timeout in sec
    100,    // Slow advertising interval, if > 0, fallback to
    // slow interval on adv timeout and advertise until connected
    0,     // Min. connection interval
    0,     // Max. connection interval
    -1,     // Led port nuber
    -1,     // Led pin number
    0,     // Tx power
    NULL    // RTOS Softdevice handler

};

void ReadPTHData()
{
    TPHSENSOR_DATA data;

    g_TphSensor.Read(data);
    g_TphSensor.StartSampling();

    g_AdvData.Type = BLEADV_MANDATA_TYPE_TPH;

    // NOTE : M0 does not access unaligned data
    // use local 4 bytes align stack variable then mem copy
    // skip timestamp as advertising pack is limited in size
    memcpy(g_AdvData.Data, ((uint8_t*)&data) + 4, sizeof(BLEADV_MANDATA_TPHSENSOR));

    // Update advertisement data
    BleAppAdvManDataSet(g_AdvDataBuff, sizeof(g_AdvDataBuff));
}

void BlePeriphEvtUserHandler(ble_evt_t * p_ble_evt)
{
    if (p_ble_evt->header.evt_id == BLE_GAP_EVT_TIMEOUT)
    {
    // Update environmental sensor data every time advertisement timeout
    // for re-advertisement
      ReadPTHData();
    }
}

Source code at :https://github.com/IOsonata/IOsonata/blob/master/ARM/Nordic/exemples/TPHSensorTag.cpp
Complete Eclipse based project is on github:  nRF52 ProjectnRF51 Project. Same code works for both nRF51 & nRF52 series including nRF52840


Monday, December 18, 2017

Bluetooth LE with Nordic nRF51 & nRF52 Series

The easy way! 

Part 1 


Writing BLE firmware using the Nordic nRF51 & nRF52 SDK is not an easy task. The learning curve is quite steep for a beginner.   The IOsonata library encapsulates all that difficulties by providing a simple way to write BLE application firmware.

Prerequisite 


Software 


The IOsonata library development environment is based on Eclipse & GCC compiler.  All projects are eclipse's native.  They can be imported directly into eclipse.  However the source are organized in a specific folder tree.  Follow the blog posts to setup the environment,  for Eclipse setup, for IOsonata setup.

Hardware  


Off course there are hardware needed to write Bluetooth firmware.  Since this is about Nordic nRF5x series, any boards or module based on that chip can be used.  An other tool required is a compatible debug JTag tool to be able to flash and debug the code.   The IDAP-Link debug JTag supports flashing of the nRF5x series.  The IDK-BLYST-NANO and the IDAP-Link would make a great BLE development kit.


nRF52832 finger tip sized module available at CrowSupply

IMM-NRF52832
IDAP-Link


Some basics


Lets start with some basic about Bluetooth LE devices.  We are not attempting to go into the details of BLE specs here but merely some need to know in order to decide the right path to application.   There are 2 main category of BLE devices.  The Peripheral acts as BLE server.  This is usually the sensors, the watch, the tracker, the locks, etc...  The other type of devices are the Central.  It is the one that connects to the Peripheral to get data from.  The Central devices are mostly the computers, the smart phones and tablets.  Further, Nordic provide the BLE stack for their nRF51 & nRF52 series SoC in the form of binary called Softdevice.   This Softdevice support both Peripheral and Central mode.  It has to be flashed with the firmware app in order to use BLE.

BLE Peripheral Firmware 


The BLE Peripheral device always start by advertises its presence so the Central device can see and connect to it or not.   The Peripheral device can be an advertiser only not allowing Central device to connect to it.  This mode is often called connectionless or beacon.  It is the simplest form if BLE Peripheral device.  Here is how we can write the firmware of such device.


Device configuration 


The IOsonata made thing simple and flexible to use any devices in an embedded system.  Only two steps are required prior to use the device.  First, declaring the device configuration by filling a data structure of that device.  This data structure usually contains configuration for all operating mode of a BLE device.  Lets see how to define the device configuration structure for a BLE advertiser peripheral device.


#include "istddef.h" 
#include "ble_app.h" 

#define DEVICE_NAME      "Advertiser"
#define APP_ADV_INTERVAL    MSEC_TO_UNITS(100, UNIT_0_625_MS)

const BLEAPP_CFG s_BleAppCfg = {
   { // Clock config nrf_clock_lf_cfg_t
#ifdef IMM_NRF51822
       NRF_CLOCK_LF_SRC_RC, // Source RC
       1, 1, 0
#else
       NRF_CLOCK_LF_SRC_XTAL, // Source 32KHz XTAL
       0, 0, NRF_CLOCK_LF_ACCURACY_20_PPM 
#endif
   },
   0,    // Number of central link
   0,    // Number of peripheral link
   BLEAPP_MODE_NOCONNECT, // Connectionless beacon type
   DEVICE_NAME,           // Device name
   ISYST_BLUETOOTH_ID,    // PnP Bluetooth/USB vendor id
   1,          // PnP Product ID
   0, // Pnp prod version
   false,  // Enable device information service (DIS)
   NULL,
   NULL,       // Manufacture specific data to advertise
   0,          // Length of manufacture specific data
   BLEAPP_SECTYPE_NONE,    // Secure connection type
   BLEAPP_SECEXCHG_NONE,   // Security key exchange
   NULL,       // Service uuids to advertise
   0,    // Total number of uuids
   APP_ADV_INTERVAL, // Advertising interval in msec
   0,  // Advertising timeout in sec, 0 for never
   0,  // Slow advertising interval, if > 0, fallback to
       // slow interval on adv timeout and advertise until connected
   0,
   0,
   -1,             // Led port nuber
   -1,             // Led pin number
   0,              // Tx power
   NULL            // RTOS Softdevice handler
};

The code 


Now that the type of BLE Peripheral device has been defined.  Lets bring it to live with the main code.  All that is needed is to call 2 functions.


int main()
{
    BleAppInit((const BLEAPP_CFG *)&s_BleAppCfg, true);
    BleAppRun();
 
    return 0;
}


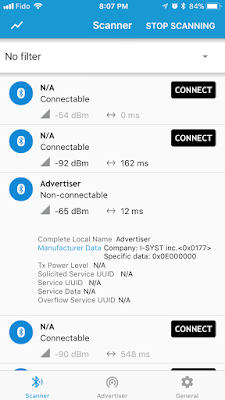
That is all the code you need to write to create a BLE Advertiser firmware.  Nordic NRF-Connect App can be used to see the advertisement.


Use NRF-Connect App to view advertisement data


Now we can see our device shows up on the scan.  That's about it.  What is of interest is that in the advertisement packet there is a little private data that we can use to send data.  Lets try to send a 32bit counter with the advertisement packet to make our Advertise more interesting.  The counter will count every time the advertisement times out.

In order to send the count we need to add it to the config so that the library would know.


#define APP_ADV_TIMEOUT   1 // Advertisement timeout in sec

uint32_t g_AdvCounter = 0;

const BLEAPP_CFG s_BleAppCfg = {
   { // Clock config nrf_clock_lf_cfg_t
#ifdef IMM_NRF51822
       NRF_CLOCK_LF_SRC_RC, // Source RC
       1, 1, 0
#else
       NRF_CLOCK_LF_SRC_XTAL, // Source 32KHz XTAL
       0, 0, NRF_CLOCK_LF_ACCURACY_20_PPM 
#endif
   },
   0,    // Number of central link
   0,    // Number of peripheral link
   BLEAPP_MODE_NOCONNECT, // Connectionless beacon type
   DEVICE_NAME,           // Device name
   ISYST_BLUETOOTH_ID,    // PnP Bluetooth/USB vendor id
   1,          // PnP Product ID
   0, // Pnp prod version
   false,  // Enable device information service (DIS)
   NULL,
   (uint8_t*)&g_AdvCounter,// Manufacture specific data to advertise
   sizeof(g_AdvCounter),   // Length of manufacture specific data
   BLEAPP_SECTYPE_NONE,    // Secure connection type
   BLEAPP_SECEXCHG_NONE,   // Security key exchange
   NULL,       // Service uuids to advertise
   0,          // Total number of uuids
   APP_ADV_INTERVAL, // Advertising interval in msec
   APP_ADV_TIMEOUT,  // Advertising timeout in sec, 0 for never
   0,  // Slow advertising interval, if > 0, fallback to
       // slow interval on adv timeout and advertise until connected
   0,
   0,
   -1,             // Led port nuber
   -1,             // Led pin number
   0,              // Tx power
   NULL            // RTOS Softdevice handler
};


In addition to the config, we need to catch the advertisement timeout to update the counter.  This is accomplished by overloading the function

void BlePeriphEvtUserHandler(ble_evt_t * p_ble_evt)
{
    if (p_ble_evt->header.evt_id == BLE_GAP_EVT_TIMEOUT)
    {
       // Update counter and advertisement data
       g_AdvCnt++;

       BleAppAdvManDataSet((uint8_t*)&g_AdvCnt, sizeof(g_AdvCnt));
    }
}

Complete Eclipse based project is on github:  nRF52 ProjectnRF51 Project. Same code works for both nRF51 & nRF52 series including nRF52840.


Part 2 Part 3